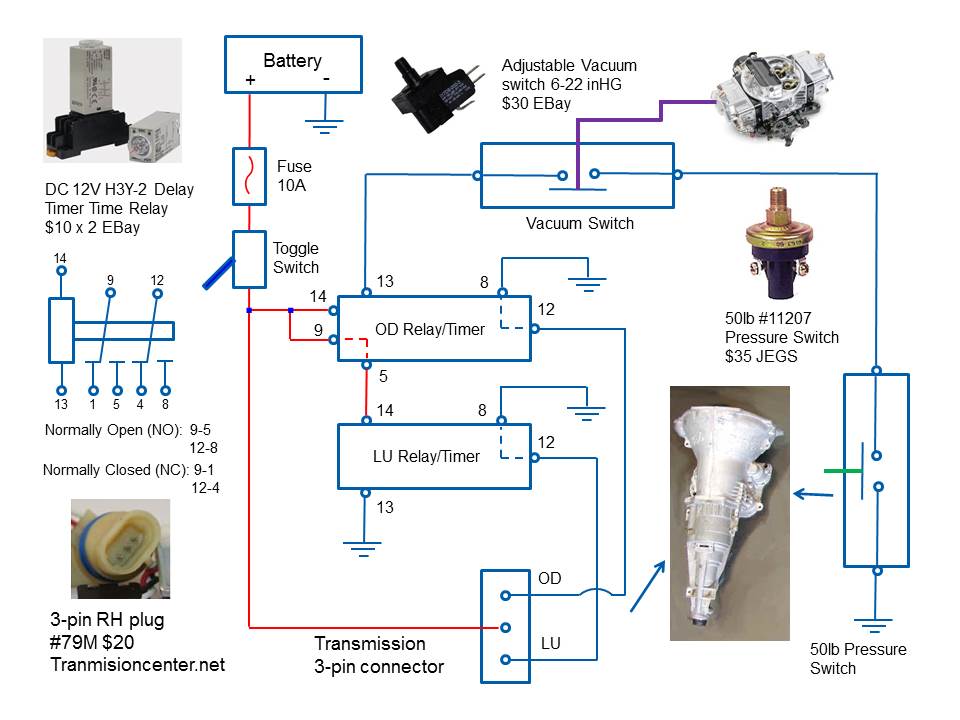
After rereading the entire thread, I came up with a couple more things that might be of interest for anyone else contemplating or dealing with this swap;
The original 727 cooler hard lines are a smaller diameter than those used with the 518 variants and the transmission needs OEM sized lines for the 518 type transmissions to cool properly. These lines are a larger diameter when the transmission is used behind gas engines and considerably larger in the diesels. If you can find a set in good shape, they may be adapted from a doner vehicle or failing that, made up from scratch. I chose the former, but the OEM forward cooler line I used required a 45 degree fitting entering the transmission case to angle it up to clear obstructions in my particular installation. The lines also took several hours of tweaking to fit the new application. I made up aluminum brackets, bolted to the engine oil pan on standoffs made by using longer oil pan bolts and tubing, to secure the hard lines. The lines were run through rubber lined Adle clamps secured to the standoff brackets. I chose not to restrict the flow in the larger diameter lines needed for the overdrive transmission with fittings to adapt them down to fit into the radiator tank cooler for the 727, bypassing it entirely. The lines were joined to flexible lines (braided stainless and A/N fittings in my case) forward of the engine and married to a large (11” X 11” X 1 1/2”) external plate type cooler (it’s case has pipe thread fittings instead of hose barbs) mounted in front of the radiator instead. Keeping the transmission cool with this cooler is a total non issue.
Non lockup versions, not having a lockup solenoid, use a two pin wiring socket and you would need a matching two pin harness plug. Wiring in a factory two pin plug sounds logical, but most everything you read on the conversion assumes you’re using a transmission with lockup and instructs you to locate and wire in a three pin plug. I can imagine the resulting frustration from following a given set of instructions and realizing after the fact you need a two pin plug. Murphy’s Law, you know.
The wiring diagram member Katfish provided has a picture of the solenoid wiring socket, but the caption mislabels it as the harness plug. The pictured socket is part of the internal harness attached to the solenoids and if it needs replacing, the valve body will need to be dropped for access. The caption under the picture lists the part number and price for the aftermarket replacement plug and has a web address that brings up PATC where you can order it. As noted on their website, the factory plug is discontinued and this plug is a generic WeatherPac type aftermarket plug that, while it does fit on the pins, does not key into and seal up the socket like the Chrysler specific one. I found installing this plug difficult on the bench and tweaked the pins enough trying to install it on the vehicle, I couldn’t get it on.
I elected to go to a junk yard to get the OEM plug (from a pickup) and the attendant handed me a three pin plug all right, but it was a plug (totally wrong for this) for connecting to a neutral safety switch. This neutral safety switch plug has a short pigtail (6” or so) attached to it that plugs into the vehicle harness with bullet type connectors. I finally did find a factory plug and wire it in, but the socket pins were tweaked just enough that it took two and one half plus hours of screwing around with a small screwdriver, probe, and an inspection mirror to get the factory plug over the pins and seated in the socket. I can say that trying to manipulate the plug into the socket in the close confines of the transmission tunnel with the cooler lines and linkages in close proximity while laying on the ground was a genuine PIA.
In retrospect, the PATC supplied plug will work, but I think I would;
1/ cut the locking clip off
2/ remove the ribbed gasket
3/ use bullet connectors (as the factory neutral safety switch pigtail does) on the pigtail that comes molded to the plug and install the matching bullet connectors in the switch gear harness. You then can install the plug with the transmission on the bench and leave it in. Connecting to the plug pigtail this way would be far easier than trying to put the plug directly into the solenoid socket in the confines of the transmission tunnel (I would also utilize a pigtail with bullet connectors if I were to again use a factory plug for all the same reasons).
4/ with the aftermarket plug it would be wise to paint a parting agent (Vasolene and a little paint thinner to thin it down will work) inside the socket with a small flux brush, then after attaching the plug, fill the voids in the socket around the plug with RTV (casting silicon or even bathroom or window caulk) to seal it. After the caulk solidifies it might also make the plug easier to R & R with the transmission in the car. Drilling a tiny hole in the rim of the socket adjacent to the pins would void any trapped air that prevented the plug from seating upon reinstalling after being removed.
If anyone else is interested, I can post the wiring diagram I came up with, and include pictures of the engine compartment mounted box I built to contain the control switch gear.